
CityGML Import Plugin with Materials
A downloadable tool
This Plugin for Unreal Engine 5.0 is based on the CityGML Import Plugin. It keeps that plugins functionality of creating a 3D-model based of a CityGML-file. It adds the functionality of displaying building data through the buildings material.
How to Use
Setting up the plugin
- Install the plugin.
- Drag the .gml file into the content browser or import the file.
- Right-Click the file and press build mesh.
Setting up the Player Controller
- Open the Project Settings.
- Go to Maps&Modes.
- Set Default GameMode to GameLabIIGameModeMaterialTool.
- Set Default Pawn Class to Player_CityGML.
- Press the Play button.
Setting up the VR Player Controller
- Make sure you created your project with the VR template.
- Open the Project Settings.
- Go to Maps&Modes.
- Set Default GameMode to GameLabIIGameModeMaterialTool.
- Set Default Pawn Class to PlayerVR_CityGML.
- To allow movement, you need to provide a surface to teleport on. Take a look at the VR Template.
- Connect your VR Headset and press the Play Button.
Using the plugin
Input on Keyboard and Mouse
- WASD Movement.
- Space and Ctrl for up and down movement.
- Shift to sprint forward, Mouse Wheel to change sprint speed.
- Tab to get the Material UI.
- Right Click to toggle the mouse lock to camera.
Input in VR
Since your input device might differ based on your VR Headset, I will refer to them by the names given by the Input Mappings of the VR Template. The VR functionality was tested with a HTC Vive.
- Teleport by moving MovementAxisRight up.
- Rotate yourself by 45° by moving MovementAxisLeft left or right.
- Teleport high into the air and back down with TriggerLeft.
- Simulate a Mouse with Trigger Right and a Ray sent out from the Right Controller.
- Bring up the UI with MenuToggleLeft.
The UI
- Main Widget
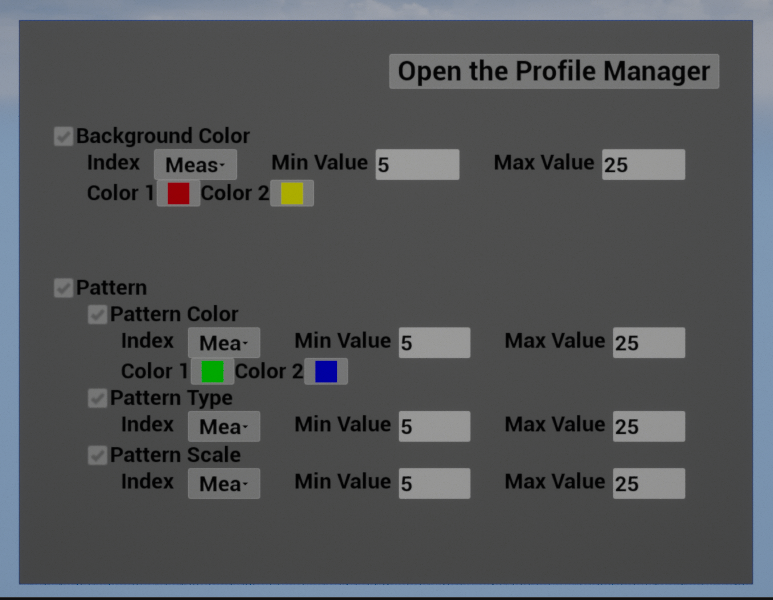
- You can toggle different parts of the material, to display data in less different ways.
- You can change the data, that should drive the changes of the material with dropdown lists.
- You can change the colors, between which should be interpolated, by clicking on them.
- You can change between which values you want to interpolate by:
- clicking the sliders and using your keyboard.
- sliding the slider.
- sliding the slider and bringing up a numpad.
- Choose some sensible values here, based on expected values depending on the import and conversion method you use.
- Bring up a a Profile Manager.
- Color Picker
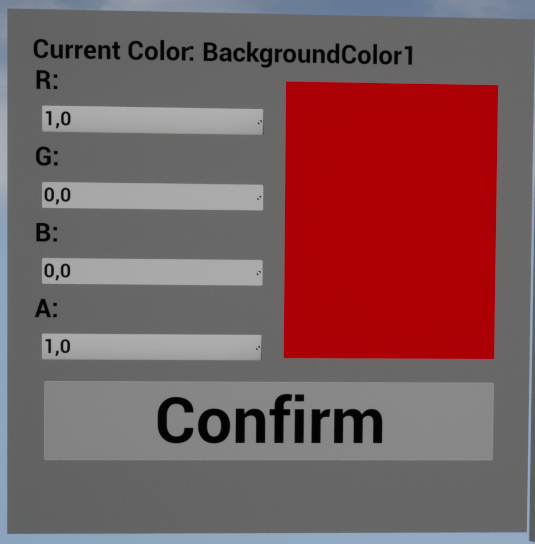
- Displays which color you are changing.
- Change the RGBA values:
- using the slider.
- by clicking the slider and inputting with your keyboard.
- Press Confirm to apply the changes to the material.
- Numpad
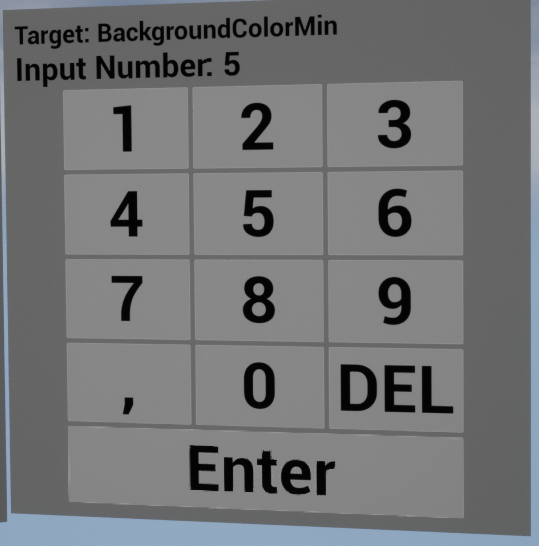
- Displays which value you are changing.
- Enter a number displayed at the top.
- Press Enter to apply the changes to the material.
- Profile Manager
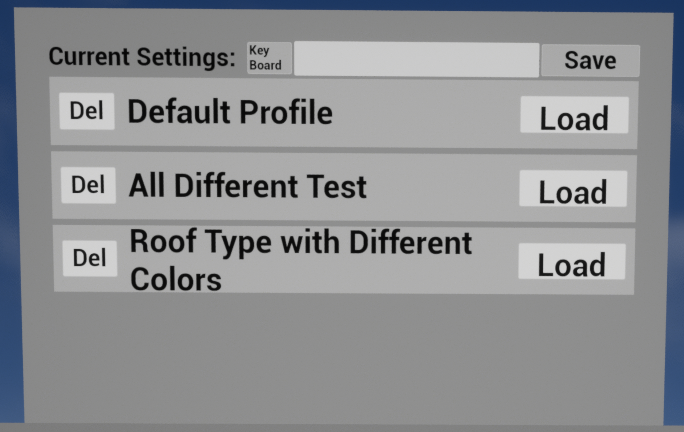
- Allows you to save your settings to have them persist between Play Sessions.
- Load your saved profiles.
- Delete your saved profiles.
- Set a name for your current save by clicking on the text-box and using your keyboard.
- Bring up a Keyboard to name your current save.
- Save your current settings once you have named the profile.
- Keyboard
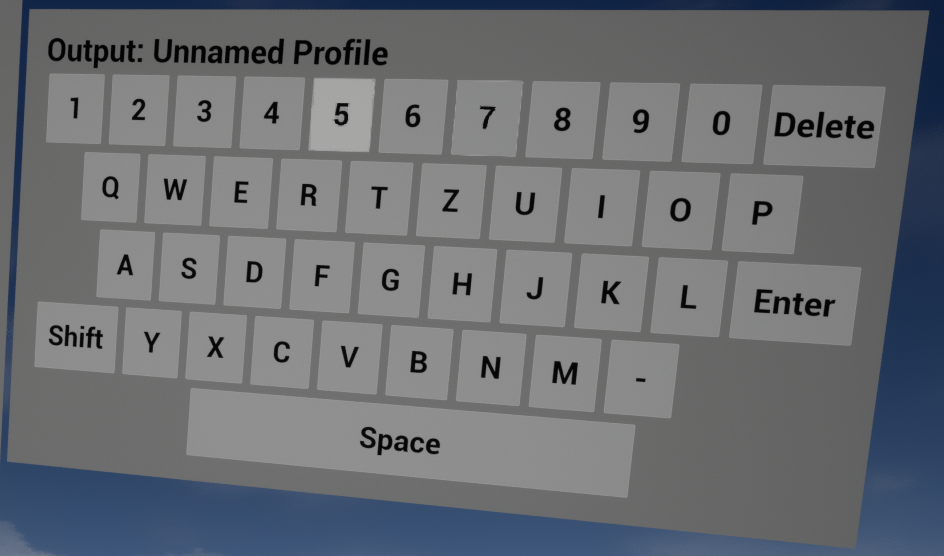
- Reqular QWERTZ-Keyboard.
- Your typed text is shown at the top.
- Press Enter to apply your text to the Name text-box in the Profile Manager.
Modification
Profiles:
- Your Material Profiles are stored in /Plugins/CityGMLImporter/Content/UI/MaterialParamProfiles.txt
- You can copy this text to different projects, where you may have installed the plugin.
- I would advise against editing the text, since this structure is needed for the plugin to correctly read your profiles.
Adding different data to be accessible to the plugin:
You may have noticed the empty spaces in the dropdown-list for the data selection in the UI. This is because originally there were plans to import more data by default.
Since we can not anticipate what data is contained in your CityGML files or how you would like to interpret e.g. strings, you will need to add this data yourself.
To do so:
- You will need an IDE, e.g. Visual Studio or Rider. Connect your IDE of Choice to Unreal Engine. Refer to their documentation for that.
- Navigate to root/<ProjectName>/Plugins/CityGMLImporter/Source/CityGMLImporterEditor/Private/Interpreter/CityGmlFastXmlCallback.cpp
- Navigate to line 437. You will see this block dedicated to the building data there.
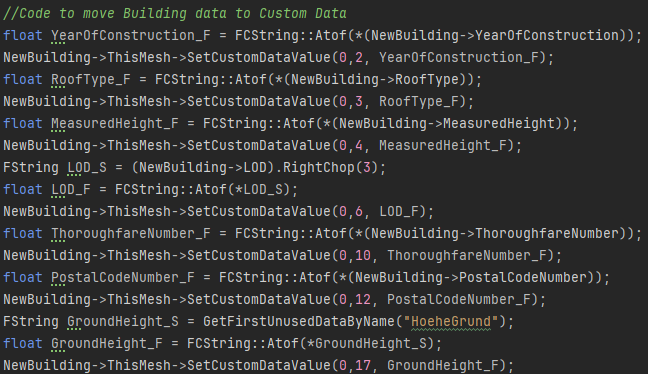
Add your code there. - First get the data, which was already imported by the old plugin:
- If the Data you need is already imported to Building Data use NewBuilding-><Name of Data>
- If the Data is in the UnusedData Array use either GetFirstUnusedDataByName() or GetAllUnusedDataByName(), that will return the data corresponding to the name as a String or an Array of Strings.
- Convert the Data to Floats. If you are certain your data is a float or int, you can cast to those. Else you might want to convert bit by bit. This all depends on your use case.
- Now Store your Data as CustomData. To do so use NewBuilding->ThisMesh->SetCustomDataValue(0, <Choose an Index>, <Your Converted Data>). If you are running out of space in the custom data array you may change the NumCustomDataFloats in line 431.

- Thats all you need to change in code. Don't forget to build your project. In UE 5.0 you might need to restart your Engine to apply changes.
- You will need to regenerate the CityModel from your CityGML file.
Now we need to make some changes to the UI to display our new options correctly.
- Open /Plugins/CityGMLImporterContent/UI/Widgets/Material_Editor. By default the plugin folder is hidden, so you might need to change that.
- First Select all 4 Dropdown lists. Under Content->Default Options change the same Index you used in the code to an appropiate name. If necessary add new elements to the array.
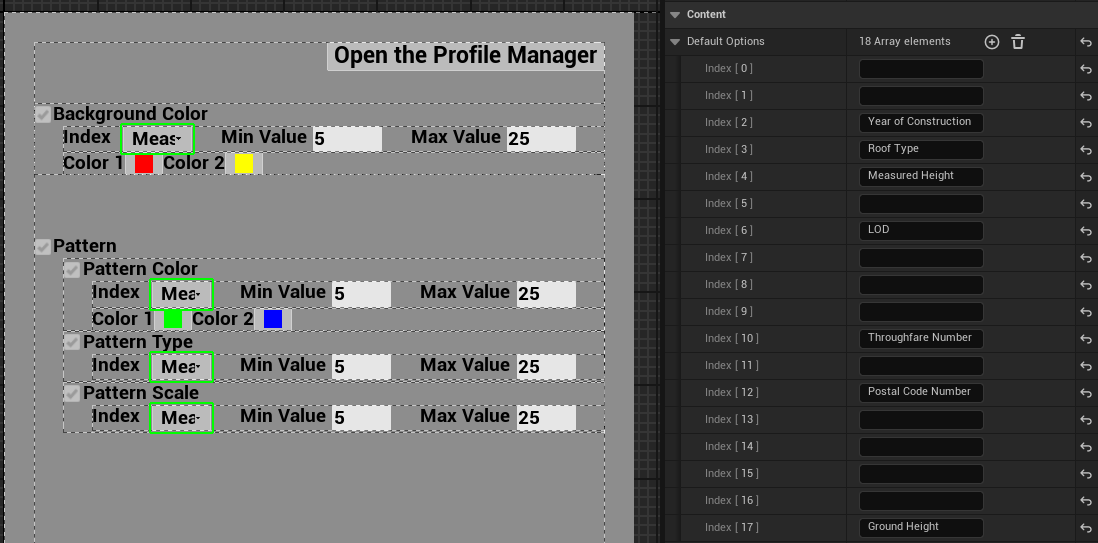
That's it. You have now added new Data, which should be available as soon as you press play.
Changing the Material
You may change parts of the material, but I would suggest to keep the basic structure intact.
You can change the 4 different materials, that are used for the Pattern Type visualization. Refer to the structure used in the material. The rotation part is important for the material to correctly be projected onto the faces and should be included in all patterns you design.
Feedback
If you found a bug or have feedback, preferably don't. For me this was a university project and as far as I'm concerned I'm done with it. If you find the documentation lacking however, feel free to write a comment, and I will probably answer to it.
Download
Install instructions
Simply put the unzipped Folder in the Plugins Folder of your Engine or Project. If you don't have any Plugins installed already, you might need to create a Plugins Folder. Only tested with UE 5.0.

Leave a comment
Log in with itch.io to leave a comment.